How to Draw a Feathered Christmas Tree on Wood
(For Customer who Would Like to Buy Them - Pre-Made Feather Trees are Available too)

~ ~ ~ ~ ~ ~ ~ ~ ~ ~ ~ ~ ~ ~
Plumage Feather Tree (Easy)
~ ~ ~ ~ ~ ~ ~ ~ ~ ~ ~ ~ ~ ~
This an Easy Craft Project for Small Children & the Options are Endless in How the Final Look Will be. Use Whatever Color & Style Small Feather that You Prefer. See All of Our Beautiful Feathers Styles Here
Begin by Making a Cone Shaped Base. This Can be Done With a Stiffer Paper & Staples or Glue or if You Want to Skip this Step, Buy a Styrofoam Cone. This Tree Can be Any Size Desired.
Use a Glue Gun or Other Type Glue to Begin Adding Feathers Close Together to the Base in Rows Proceeding Up to the Next Row as Each One is Finished. Feathers Should be Glued at the Stem in an Upside Down Fashion with the Natural Curve of the Feather Facing Down & Out. This Will give Your Tree a Fluffy Look Similar to the Branckes of a Regular Tree. Feather Sizes can Be Stagered to Give a More Natural Look or Exactly the Same. Always Be Sure to Cover the Previous Glue Row as You Proceed to the Top so That All You See is the Feather Fluff.
Children Will Love this Simple Feather Tree Project & can Have Even More Fun by Decorating these With Pom Poms, Sequins, Bird Seed, or Whatever They Desire. 
~ ~ ~ ~ ~ ~ ~ ~ ~ ~ ~ ~ ~ ~ ~
Pine Cone Feather Tree - Easy
~ ~ ~ ~ ~ ~ ~ ~ ~ ~ ~ ~ ~ ~ ~
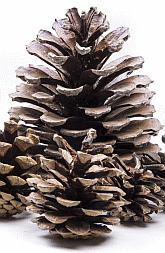
Using the Instructions Above, a Feather Chritmas Tree can Also be Made Using a Large Flat Bottomed Pine Cone. Just Glue as Many Feathers as Needed to Each Tip of the Pine Cone Working From the Bottom to the Top.
 DIY Feather Tree Kits
~ ~ ~ ~ ~ ~ ~ ~ ~ ~ ~ ~ ~ ~ ~ ~ ~ ~ ~ ~ ~ ~ ~
Old Fashioned German Christmas Feather Tree (Hardest)
~ ~ ~ ~ ~ ~ ~ ~ ~ ~ ~ ~ ~ ~ ~ ~ ~ ~ ~ ~ ~ ~ ~
Making Your Own Homemade German Goose Feather Tree is a Fun Weekend Project that Anyone with a Little Craft Experience can Make Themself. We Offer Basic Directions Below or if this Seems too Hard to Figure Out, You can Order a Complete, Pre-Cut Kit Here.
Branches Made of Wire Stems Covered With Feathers Continuously Wrapped Along the Entire Length. Branches Should be in Several Lengths Using the Larger Ones as You Move to the Bottom of the Tree, Again Similar to the Fake Christmas Tree Layout. Each Section of the Tree Should Have a Few or Many Branches of Similar Size Depending on the Fullness of the Tree Desired.
A Heavy Base Made of a Chuck of Wood or Heavy Flower Pot filled With Concrete, Plaster of Paris, or Stones Strong Enough to Support Your Christmas Feather Tree.
General Supplies:
Goose Biot Feathers
16 Guage Branch Wire
1/2" Wooden Dowel
Clay Pot, Wood Block
Green Floral Tape
Glue Gun & Glue Sticks
Other Tacky Craft Glue
Crepe Paper Streamer
Holly Berries
Directions:
Biot Goose Feathers are Traditional for Making German Feather Trees but Could be Substituted With Other Feather Styles that have a Flexible Stem Such as the Large Turkey Marabou Feathers.
1st Decide How Tall You Would Like Your Christmas Tree to Be & Cut the Dowel for the Center Stem to the Length Desired.
2nd Decide How Many Branches You Want to Have for Each Row. Old Fashioned Feather Trees have 4 or more Branches on Each Tier, & 5 or More on the Bottom of Taller Trees. Personal Preference is Key Here. Drawing Your Tree on Paper May be Very Helpful in Determining What Works for You. Each Branch Should Have a 1" Unwraped End where no Feathers are Wrapped to Make Room for Attaching to the Tree Trunk Later. Each Row Should be Approx. 1" for Smaller Trees & 2" Longer or More as You Proceed to the Bottom of the Tree. Also Remember to Feather the Top Few Inches of Your Trunk Stem.
Instructions for Making Branches:
If You are Including a Holly Berry at the Tip of Each Branch, Place Your Berry Wire Along Side of Your Wire & Wrap Both Together With Floral Tape. You can Do this With Any Type of Bead or Decoration as Long as it is Set on a Wire 1st & Floral Taped On. Do this for Every Branch & The Trunk Top. Use Glue on Floral Tape End if Desired.
Floral Tape the Tip (Thinner End) of the Feather to the Branch Next to the Holly Berry & Tack Glue. The Long End of the Feather Should be Hanging off Along Side of the Berry. This Will Seem Backwards but You are Basically Tucking the Feather Tip in Under the Rest of the Feather that Will Wrap Around the Wire. Now You Can Begin Wrapping the Feather Around the Branch by Starting to Wind the Feather Right Next to the Holly Berry in a Somewhat Tight & Close Manner. Try not to Leave any Spaces or Gaps as You Continue to Wrap the Feather in the Direction of the Other End. An Average Feather will Only Cover 1" or so of the Branch. Be Sure to Floral Tape the End Also Catching the Next Feather in Under the Tape as Done Previously. Secure the Final Feather with Floral Tape & Tack with Glue if Necessary Remembering to Leave a 1" Unwrapped Wire End. Uaing Needle Nose Plyers, Make a 1/4" Right Bend on each Branch End.
Tree Assembly:
Layout Your Trunk Stem Placing the Branches Alongside Keeping Them Evenly Spaced from Row to Row. Mark Where the Branches Should Connect on the Stem. Drill Small Holes Around Dowel at Each Branch Level. Starting at the Top Row, Place the Bent End of the Highest Branches into the Stem (Evenly Spaced Around Stem) Wrap a Length of 12" of Thin Wire Around the Stem & Over the Branch Bottom Ends in a Criss Cross Fashion.
You Can Now Add a Layer of Brown Crepe Paper or Brown Floral Tape to the Wooden Center Dowel Starting Just Below the Branches & Again Spiraling Down Over the Wired Trunk. Continue to Add the Remaining Rows of Branches & Crepe Paper till Your Christmas Feather Tree is Completed. Be Sure to Tack Glue as Needed.
If Using a Clay Pot With Cement, Mix Enough Cement to Fill it Almost to the Top. Place the Truck of Your Tree Into the Cement While Still Wet & Brace or Hold as Needed. Another Option is to Poke Something into the Cement Making a Hole Big Enough for the Trunk to be Added Later. Wood Blocks can be Drilled Accordingly.
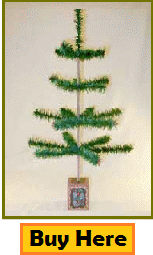
Now & Finally...the Fun Part, Bend the Branches Down to Reflect that Old Fashioned Heirloom Feather Christmas Tree Style!
Important Note: Feel Free to Do a Sample Branch or Smaller Sample Tree Just to Get a Feel for This Project & Don't be Afraid to Use Glue or Longer Wires Since These can be Cut Later.
An Average Goose Biot Will do an Inch of Stem Area so to Estimate How Many Goose Biot Feathers You Might Need for Your Feather Tree...Measure the Lengths of Each Wire Branch or Stem & Combine to Get the Total # of Inches Needed. (1 Feather = 1" of Stem)
~ ~ ~ ~ ~ ~ ~ ~ ~ ~ ~ ~ ~ ~ ~ ~
Glitter Christmas Tree (Medium)
~ ~ ~ ~ ~ ~ ~ ~ ~ ~ ~ ~ ~ ~ ~ ~
For a Modern Look, Make a Glitter Tree Using the Instructions Above for the Old Fashioned Feather Tree but Instead of Feathers, Wrap Metallic Christmas Garland Around the Wire Frame.
Enjoy!!!
somervilleinceed55.blogspot.com
Source: https://www.smileyme.com/homemade-christmas-feather-tree-directions-instructions.asp